More and more people are leaving websites due to slow-loading webpages. It’s becoming more common and the slower a page loads, the more the bounce rate increases. In fact, a recent study found that 53% of people will abandon a mobile website that takes more than three seconds to load. Having slow loading pages means fewer visitors, lower conversion rates, and decreased revenue. Displaying multiple high-resolution images on a webpage can make the page load slow and will have your visitors leaving before those large files load. Using the right file size, that's optimal for web images will decrease page load time and decrease bounce rate, allowing visitors to stay on your website longer, become more engaged, and increase conversion rates.
To optimize images for the web, you have to resize and compress larger images to a smaller format in such a way that the image doesn’t lose quality and can still maintain its clarity across all devices. There are different ways that this can be achieved to keep your pictures and visitors.
Image File Type Options
There are four prominent file types that are used to save out web-friendly optimized images. They are JPG, PNG, SVG, and GIF. Each file type is used for a specific type of image. An image might look and work better as one file type compared to another. There are images that are suited for a certain purpose and are required to be saved in a certain way. There are pros and cons for all four of the file types. Raster images are pixel-based so finding the best file format, that offers the highest performance may take some experimenting.
 JPEG
JPEG
Files that are saved out this way are normally smaller in size than other types. This is used for more complex images that contain a range of colors, shadows, gradients, highlights, or patterns. JPEGs have a higher color palette to allow this type of image to be processed. They can also range from high to low quality by how it is saved, so quality and file size can be compared. However, when compressed some quality can be lost.
 PNG
PNG
PNG’s can produce a higher quality image, but with larger file sizes. PNG files tend to be saved out because it allows for a transparent background. It is a lossless image format, so the quality isn’t lost when reduced but this creates that bigger file size.
 SVG
SVG
These images are infinitely scalable vector graphics that won’t lose their image quality. They take up less space depending on the complexity of the vector and can help with page load. This wouldn’t be used for digital photography but more graphics like icons, logos, or vector illustrations.
 GIF
GIF
The GIF is another file format that creates lossless compressions. This only uses 256 colors and is very limited. It should be used for animated graphics and the file format should be used minimally on the page as they tend to be a larger size.
How to Save Images
Preparing image files for print is very different than for the web. Print files need to be at 300DPI, CMYK, outlined, and uncompressed. This ends up being an incredibly large file that would be unsuitable to use on a site.
For the web, the number of pixels determines file size. Changing just the PPI doesn't alter the file size at all. Having an image at 300PPI at 500px x 500px vs an image at 72PPI at 500px x 500px will give you the same file size. The file size depends on the size of the image and how the quality is saved out as. Images for the web are also saved out as RGB.
In Photoshop, to scale your image go to Image > Image Size. A banner size can be around 1200px to 1600px, but for normal images, the width should generally be smaller to not have full-width images. This astronaut image went from 3032px x 2008px at 885KB to 1200px x 795px at 82KB. Resize your image to the exact dimensions you need so you are not wasting space with a larger image that will be cropped later on the site. This is also where you can change the resolution.
How to Compress your Images
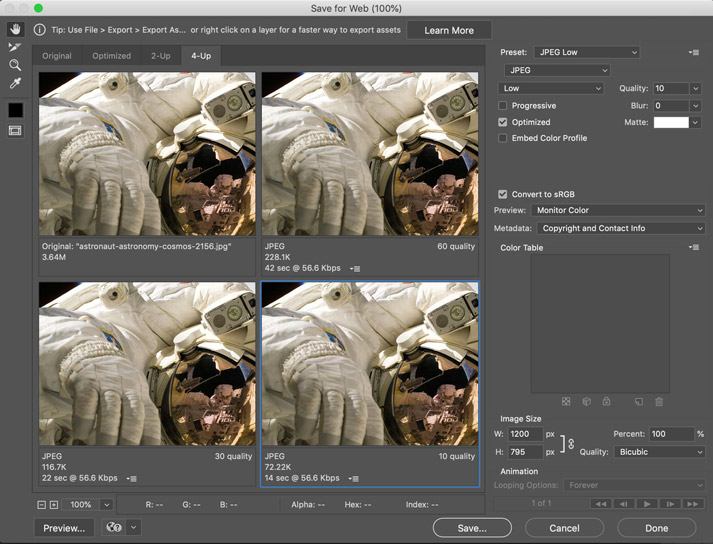
When saving out images in photoshop go to File > Export > Save for Web (Legacy). You will notice that there are options to save out different JPGs, PNGs, and GIFs. There is also a four-panel screen that compares the quality of the image, size, and speed at which it will load.
For the example of the astronaut, the low image is almost 3 times smaller and faster than the high-quality image and 50 times smaller than the original. Choose between progressive or optimized when saving out. Progressive downloads your image in multiple passes, making it look like it’s gradually downloading on your screen, while optimized will create a smaller file size (only slightly), but will be less compatible, while all modern browsers support it. The quality dropdown has a slider to increase or decrease the image data.
This astronaut image wouldn’t be suitable for a PNG, as saving it out would create a huge file size that would take too long to load. In the end, the low-quality image(right) looks the same as the original (left).

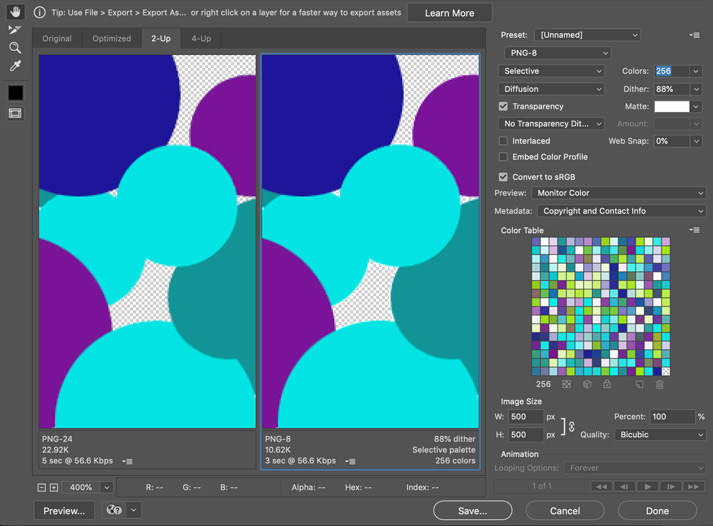
If an image needs to be saved with transparency than the PNG-24 format would be better to prevent a white border around the image. The white border could be modified by using the matte dropdown and selecting none. If you are saving an image without transparency than saving it as PNG-8 and unchecking transparency box and setting the colors dropdown box to the number of colors that your image possesses, while still looking good is a way to decrease the file size.
A two-color image could need 2 or 4, but an image with more colors could need 128 or 256. The more colors that are used, the larger the file will be, but the more quality it will have. Notice that changing these settings will alter the quality, size, and speed of the image. Looking through the different options will allow you to have different types of sizes you need while saving.
To optimize WordPress images without a plugin, resize the image. You can resize directly in Wordpress Media Library by going to Media > Select your image > Edit image and pick new dimensions for your image. The Media Library will create thumbnails based on the setting you picked, but the original file size does not go away. If you want to save space, then you can use TinyPNG.
TinyPNG will let you compress images to optimize both JPG and PNG images. The site will compress JPGs up to 60% and PNGs up to 80% while converting CMYK images to RGB. Upload your image and see how much it is able to compress and then download your file with a name change so it doesn’t override your existing one and compare the two files.
In the end, an image should never be larger than 1MB, a normal image file is between 70KB - 400KB. An average website is about 4MB so an image should not be 1/4th of that space. Smaller photos should be between 80KB - 150KB and the larger hero images can be somewhere between 250KB - 350KB. Larger images should be used more sparingly throughout the site.
Use Proper File Names
When it comes to SEO it is important to not use the default name form the camera or image (Eg. IMG_000001). Adding relevant keywords will help your website have a higher ranking in search engines. Having a name that describes what your image is about will help Google, so a name that describes the photo and includes dashes instead of spaces will work best. A name under 25 characters and without a special character that gives the photo some context will help. There is also no need to include stop words like (a, the, it, to, etc.). A file name like astronaut-outer-space.jpg will work better than IMG_000001.jpg.
The Recap
Optimizing your images will increase the speed of your site, your search engine ranking, and increase your website's overall user experience. Leading to more visitors staying on your website and less storage on servers (which saves you money). With only a few steps a huge 15MB file can be reduced to 340KB. Every KB adds up over time and will lead to a better experience on your site.
Saving an image in its proper dimensions, knowing when to use the right file format (JPG for general photos, PNG for details and transparency, SVGs for vector images, and GIFs for animation), and experimenting with the best settings for each format will help you get the perfect photo. If a slow loading page, with massive images files, describes your current website, then we can help! Get in touch with our web design services today, and we can help speed up! By reducing image sizes, improving page load speed, and helping to grow your business one perfectly sized image at a time!